Oblique Pen Holder Set-up and Adjustment
Written on November 9th, 2020 by D. T. Grimes

Over the last ten years, I’ve written with oblique holders from many different penmakers. I’ve taken the opportunity to ask to try the holders belonging to students in my workshops. I’ve even made several myself. One thing that I know for certain is:
A good holder is one that is well adjusted for its owner.
What is an an oblique pen holder?
The oblique pen holder is a calligraphic tool with a straightforward design. It consists of a body with a slit cut into the side where a small piece of metal called a “flange” is inserted. This flange migrates the replaceable writing tip (the pen or “nib”) askew from the long axis of the body so that it can be better aligned to the paper and direction of strokes in slanted calligraphic scripts.
These elements can work together in harmony or coalesce into a mess that not even the most skilled writer could convince to make a line. The relationship of the body, flange, and pen is a delicate one, but that does not mean that it is complicated nor that we should fear it.
Why should I use the oblique pen holder?
The oblique flange may have been invented to preserve pen points by allowing for the even wear of both tines for slanted writing[1], but the actual advantages of this type of writing instrument are far-reaching in the American styles of penmanship. By displacing the pen to the outside of the holder, penmakers are able to control three adjustments which can be made to suit any penman’s unique anatomy, writing posture, and aesthetic preferences for script.
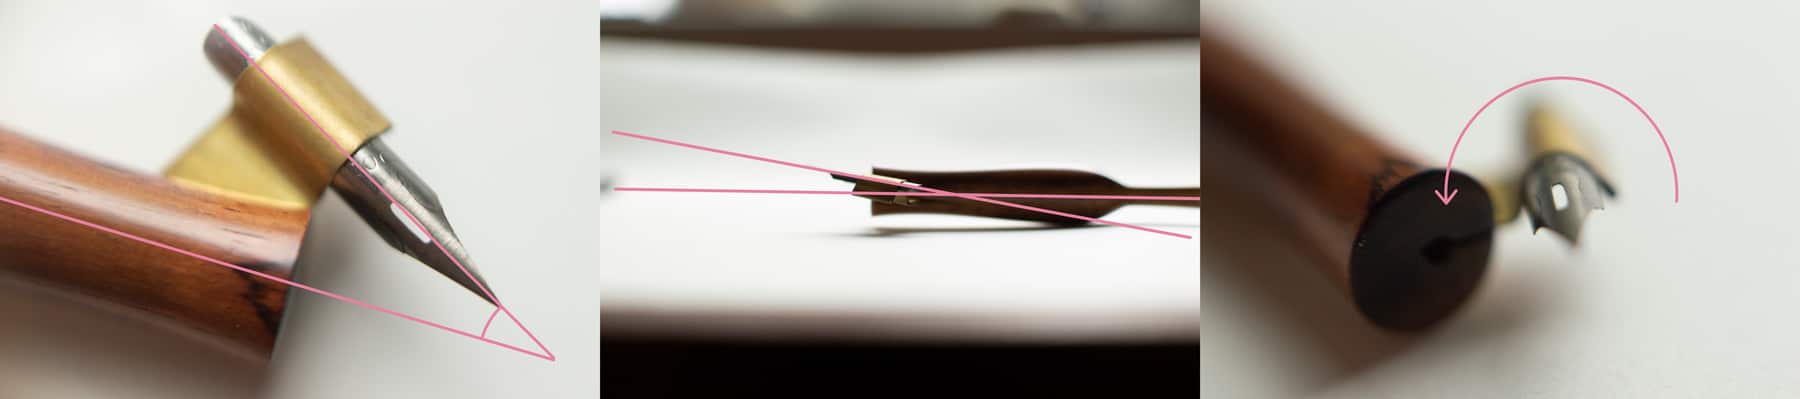
These three adjustments are known as the yaw, pitch, and roll.
Many holders come straight out of the box generally adjusted to suit most people. These adjustments are decisions that the maker made while forming the holder. They tend to be close enough that most people just write with a holder however it’s set up. The upside of buying a holder from a reputable maker is that they likely have their holder set up using universal best-practices. The downside is that many people are a bit intimidated by the idea of tweaking the metal on their holder because they see the maker’s decisions as infallible.
Customize your oblique pen holder by building a flange of your own.
To have total control over your oblique holder, you’ll need to first have a body that does not affix the flange inside of the slit with any kind of glue, pin, or permanent wedge. Many makers elect to set up holders and fix the flanges in place prior to delivery to the customer because most penmen aren’t likely to take the time to learn to adjust their holder like you are now. Unfortunately, if your flange is fixed, following along with any of the adjusting techniques outlined below might cause damage to the body of your pen. (adjust at your own risk!)
Giving up the control of my own tool would never be acceptable for me, and thus I present the following information in the hopes that it will assist you in taking ownership of your oblique holder and getting it tuned to your hand by making a flange of your very own.
Tools & Materials
This guide assumes you have a holder that is already slit and drilled in some way. The following information won’t work for every holder out there, but with a bit of common sense, I’m sure you can make it work.
You’ll need the following supplies in your flange-making toolbox:
- .010 Sheet Brass
- Brass Shears
- 400 grit sandpaper
- 3mm/5mm Bail Making Pliers
- Yoke Pen Co Duckbill Pliers
The process
Don’t be intimidated by these tools and materials if you haven’t used them before. It might take you a few times to get one just right, but brass is cheap. Just accept you have a couple practice flanges to make first.
- Begin by using a straight edge to mark a line and our brass shears to cut our .01 sheet brass into 10-12mm x 11cm strips.
- Using our 400 grit sandpaper, we can remove the burr from any side of the brass that was made rough during our cutting operation.
- The strip of metal is folded in half with the fingers and pinched at the end so that the bend remains somewhat round.
- The rounded bend is grabbed between the jaws of the 3/5mm Bailing Pliers and using the forefinger and thumb of the hand not holding the pliers we wrap the longer length of the brass around the 3mm (smaller) jaw.
- The flange is opened slightly (with the fingers) and a sacrificial nib (one you don’t mind distorting in the forming process) is inserted into the rounded slit where it would appear to sit in a finished flange.
- The flange is grabbed 1-2mm back from the edge of the nib with the duckbill pliers and is bent (with the fingers of the hand not holding the pliers) towards the top of the arc, creating the traditional flange shape. Picture this shape as being similar to a question mark without the dot.
- The long lengths (wings) of the flange are cut off at a desired length and angle so that they most suitably match the slit and retaining channel in the pen body which the flange is being made for.
- The very ends of the wings (wingtips) are bent outwards so that they can apply retaining pressure on the inside of the retaining channel.
A step-by-step tutorial
For those of you who are visual learners, I’ve put together a quick video to explain the various steps of creating and installing your first flange. Give it a watch:
Footnotes
- Patents for Inventions. Abridgments of Specifications. Vol. 95. London, 1869.